
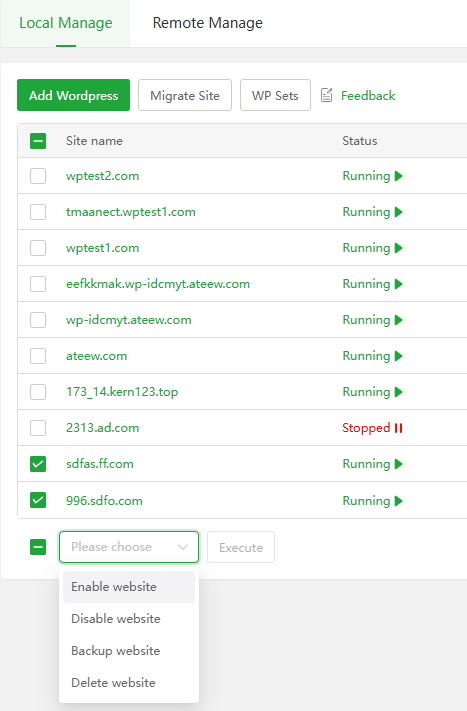
WP Toolkit -- Local Manage
WP Toolkit is a tool dedicated to managing WordPress websites
Local Manage Overview
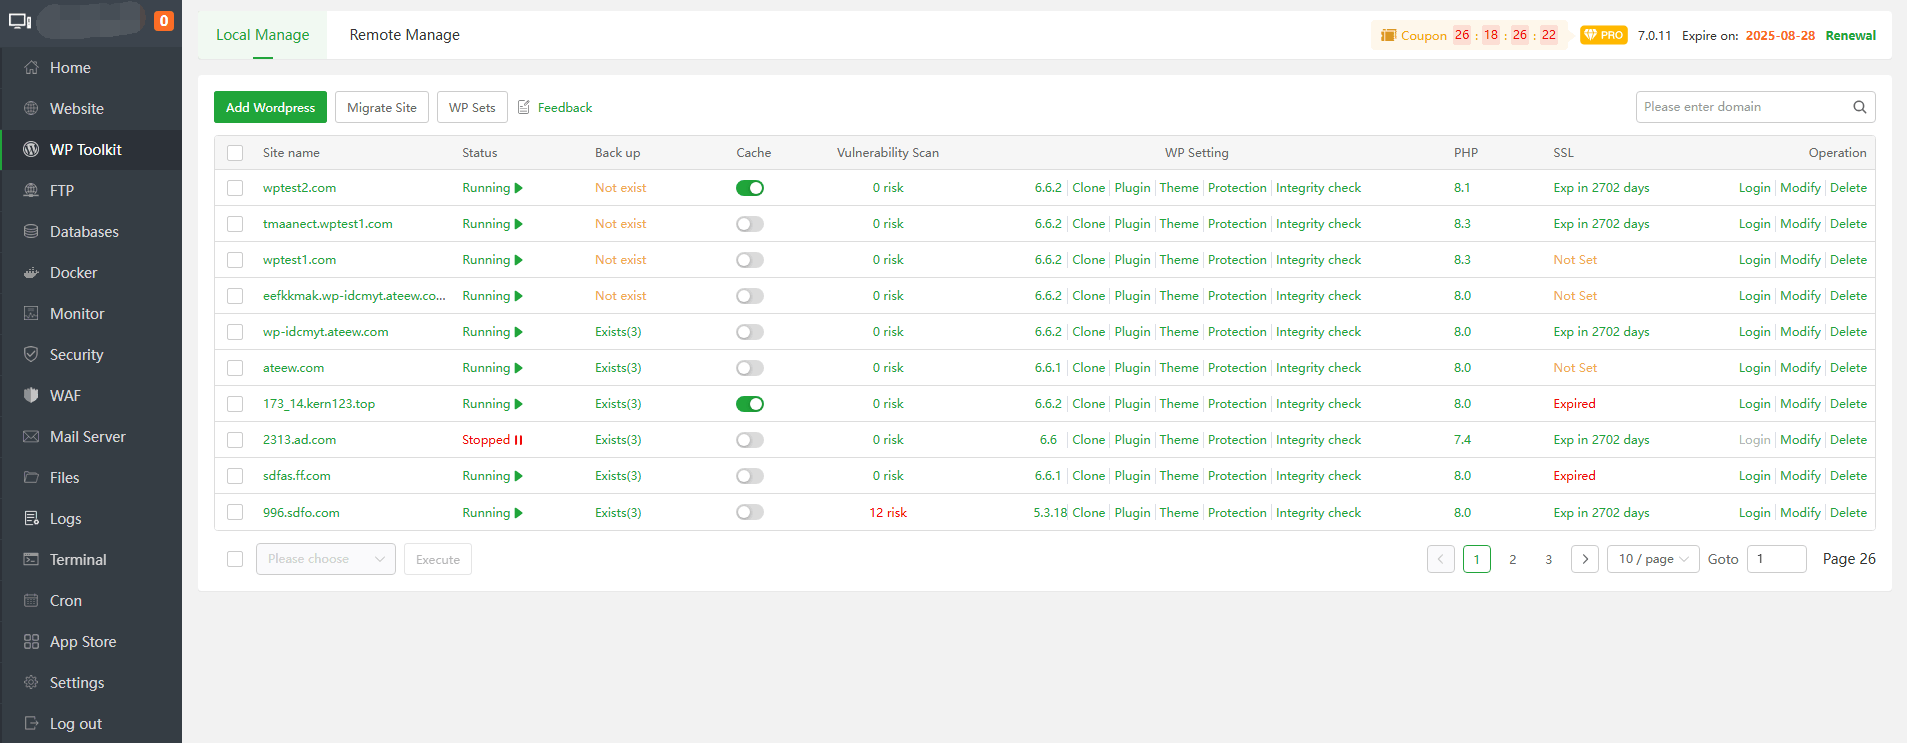
| Function | Describe |
|---|---|
| Add WordPress | Add or import a WordPress website |
The domain name bound to the site. Click the site name of the current site to configure and modify the current site. | |
| Status | Displays the running status of the current website. Click the running status of the current site to disable the current site. |
| Back up | Displays the backup status of the current site, click the current site backup status, can View, Restore, Download and Backup the current site file contains the database backup file of the current site. |
Document Root | Displays the current site directory path, click the current site directory, it will directly jump to the current directory of Files management. |
| Cache | Turn on/off Cache to cache site files to improve access speed. Currently only nginx is supported. If you don't use nginx, you can use the WordPress plugin WP Super Cache. |
| Automatically checks the current site for security vulnerabilities | |
| WP Setting | Displays the WordPress version number of the current site. Can Clone the current site, manage Plugin, Theme, use Tamper-proof for Enterprise Protection, Integrity check or Reinstall the current site. |
| PHP | Displays the PHP version number of the current site, click to change the PHP version number of the current site |
| SSL | Displays the SSL status of the current site, click to deploy SSL Certificate to the current site |
| Login | Login to the current site |
| Modify | Set the configuration of the current site. as: Domain Manager, Wordpress Setting, Security, URL rewrite, Traffic control, Error log etc. |
| Delete | Delete current site |
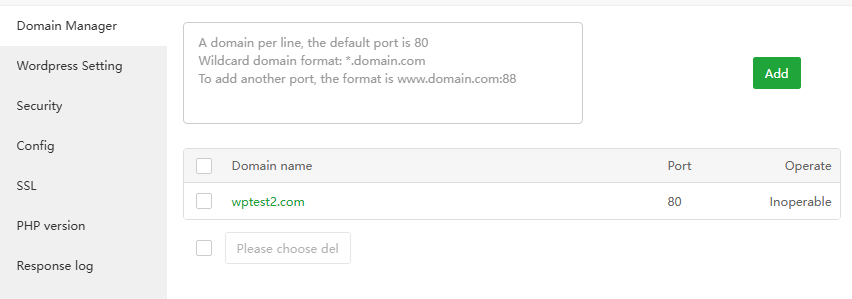
Site name or Modify
When clicking Site name or Modify, can modify the site configuration, SSL, log, etc.
Domain Manager
Add, delete domain/IP
- Wordpress Setting
Base setup
Function Describe Login URL Displays the URL of the management background login pageof the current site. Click it to open it.Status Displays the WordPress versionof the current site. If there is a new version, you can click Update to update it.Cache Turn on/off,clearthecacheof the current site, currently only supports nginx.User name Display the account of the current site administratorReset password Reset the current site administrator password. Leave it blank if no reset is required.Email address Displays the email addressof the current site administratorWebsite LanguageDisplays the languageof the current site, you can select a language supported by WordPressWPS-Hide-LoginUse WPS-Hide-Loginto hide the management background login page. After setting, you need to use thechanged management background login link.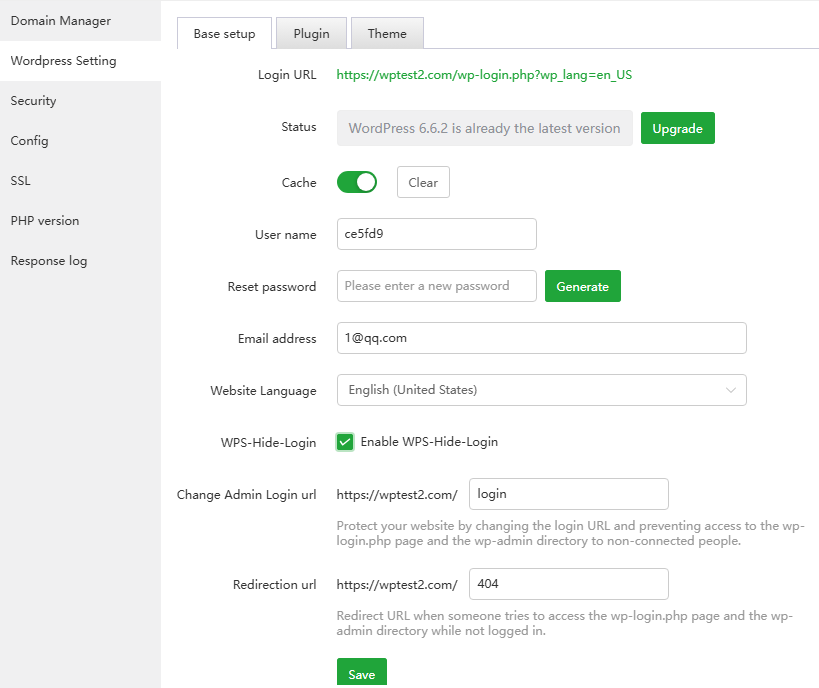
Plugin: To manage the Plugin of the current site, can
Install,Active,Uninstall, andauto updatePlugin.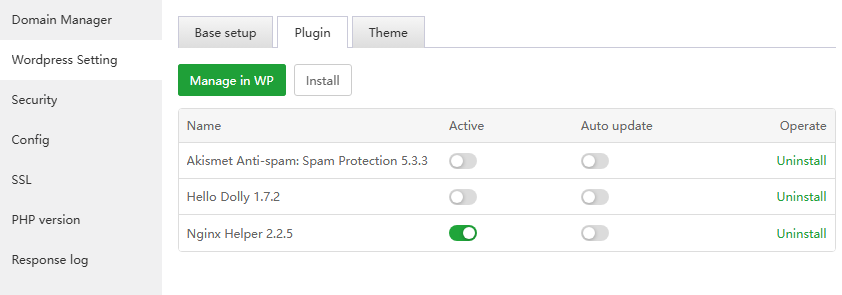
Theme: To manage the Theme of the current site, can
Install,Active,Uninstall, andauto updateTheme. Note that only one Theme can be activated.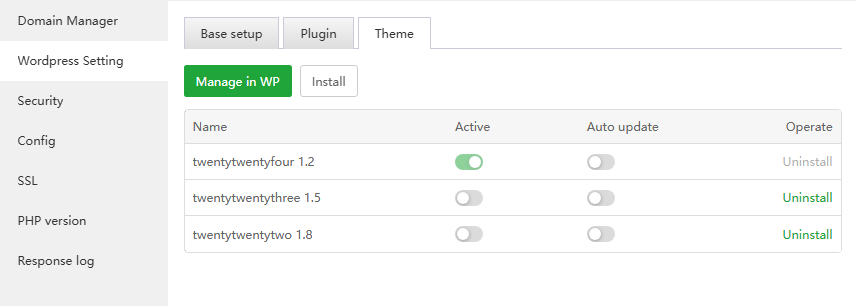
- Security
- Limit access: Specifying the
site directoryrequires anaccountandpassword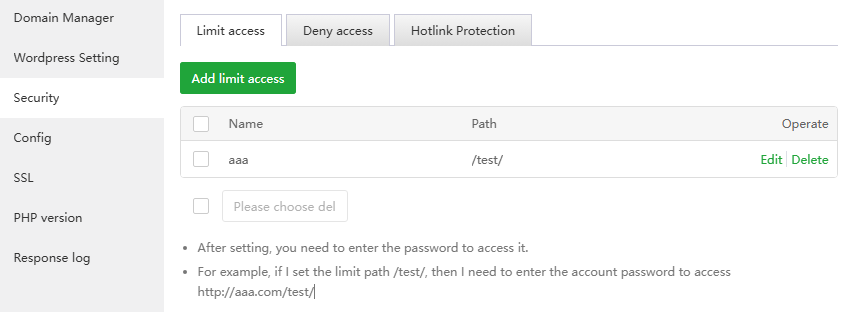
- Deny access:
Disable access filesin the specified directory of the site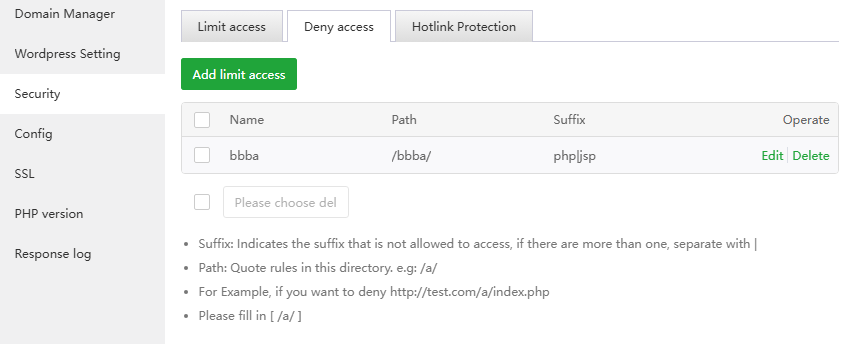
- Hotlink Protection: Only the
specified domainname can be used toaccess the resourcesof the current site. If it is not the specified domain name, an error will be returned.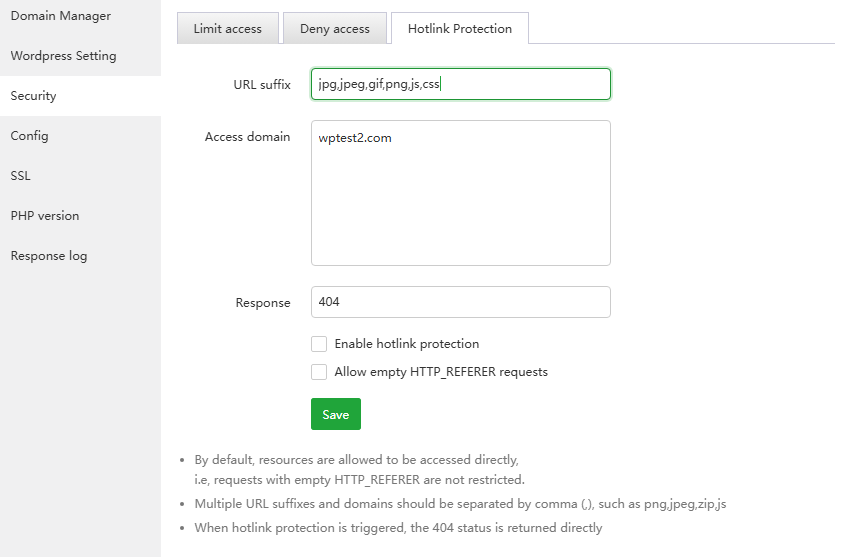
- Limit access: Specifying the
- Config
Site directory
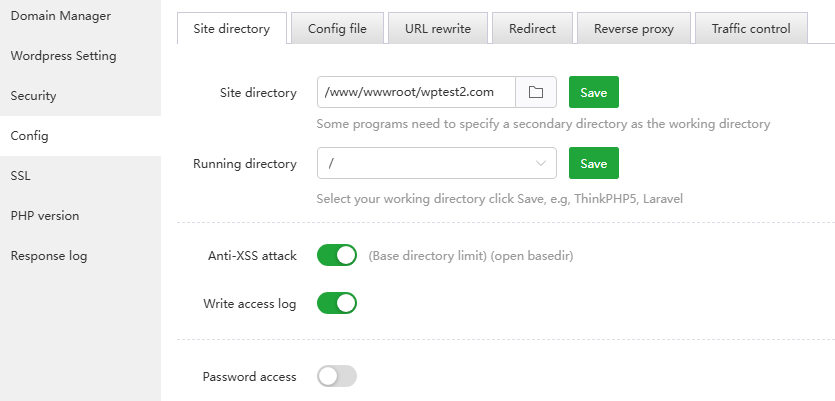
Function Describe Site directory Set the deployment directoryof the current websiteRunning directory Specify the secondary directory as the running directoryAnti-XSS attack Anti-cross-site attack (open_basedir), prevent hackers from conducting intrusion attacks through other site directories, that is, add and delete .user.inifileWrite access logTurn on/off the log of the current site and add access logs Password accessTurn on/off account and password access to the entire current site Config file
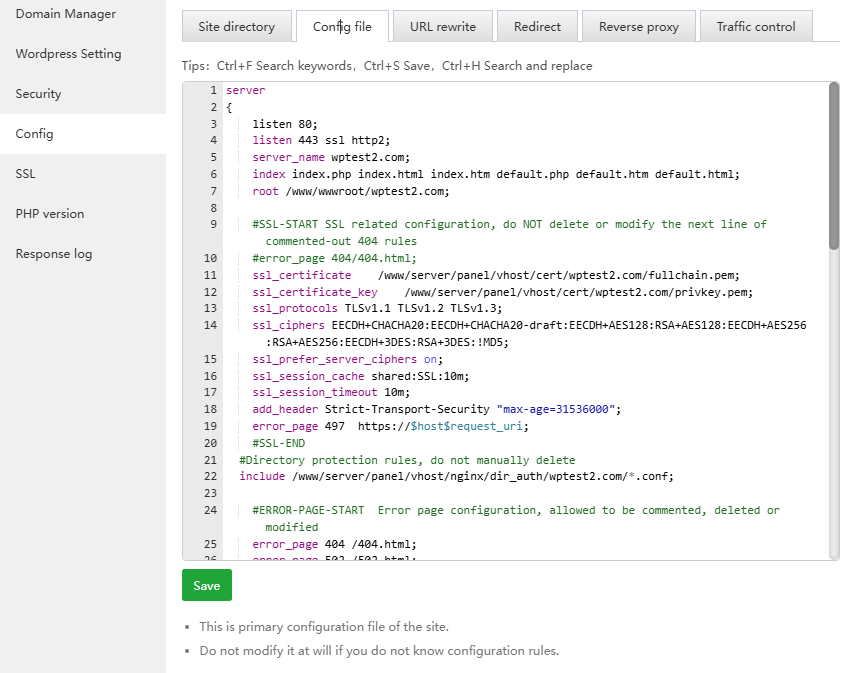
View and modify the
configuration fileof the current site.Note that if there is a # comment, please do not delete or modify it.
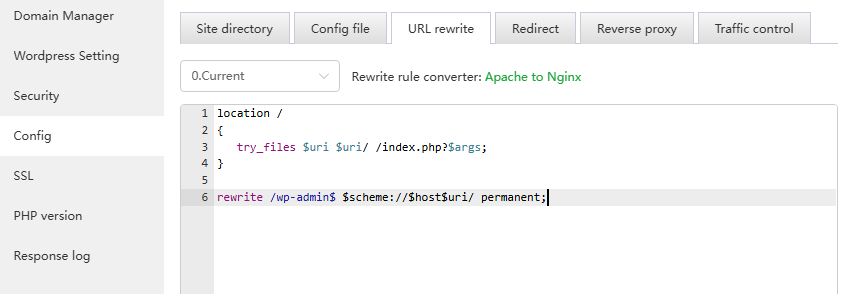
URL rewrite
createorusean existing template. Through conversion, you can convert dynamic web pages into static pages to enhance the friendliness of the search engineIf the WEB service is
Apache, it will use the.htaccessfile in the site directory by default.If the WEB service is
Nginx, Choose an existingtemplateor query thewebsite program documentationfor configuration.If replace Apache with Nginx, you need to reset the URL rewrite to the Nginx configuration.
Redirect
Set the current site's specified domain name or directory
301/302jump specified address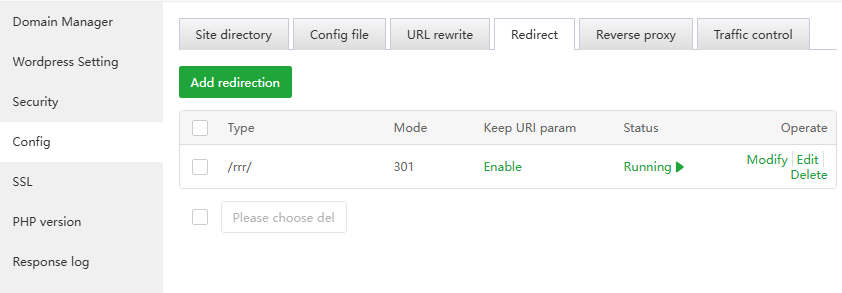
Reverse proxy
Set the current website
proxyto access resources of other sites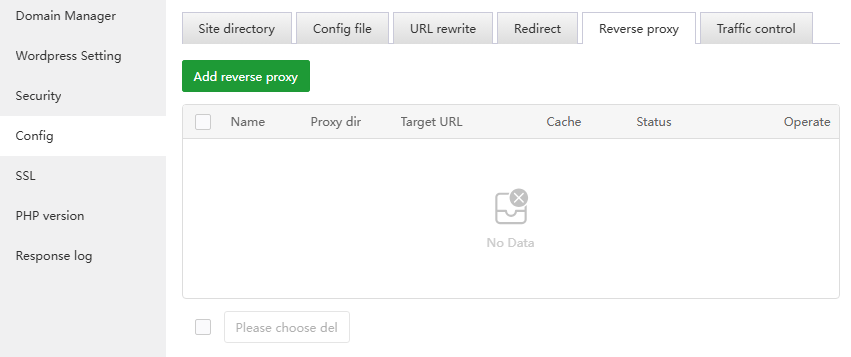
Traffic control
Limit trafficcontrol for the current site
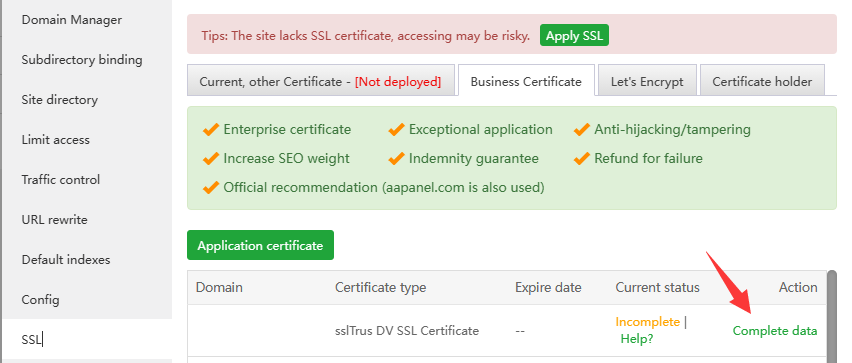
SSL
Configure encrypted access to the website, that is, use
httpsto access the websiteCurr, other Certs: View, disable, save (enable) the SSL certificate of the current site, or paste the SSL certificate content settings

Business Certificate: aaPanel commercial certificates for cooperation with SSL providers
If purchased Business Certificate, can check out this tutorial on how to verify it:
Let's Encrypt:
File verification: Let's Encrypt servers verify domain ownership by accessing this
website's files
If an error occurs, please troubleshoot first and then verify. Multiple errors will be limited Let's Encrypt Rate Limits.
If you encounter verification failure, please troubleshoot according to the prompts
- Maybe the domain name resolution has not taken effect and no resolution has been added.
- Let's Encrypt cannot access your website. You can check redirection and proxy issues. Try to access and see if the display is normal. Apply again after it is normal.
If file verification is not available, use DNS verification
If restrictions appear, use third-party website SSL
DNS verification (Wildcard support): Let's Encrypt server verifies domain name ownership by parsing
DNS records. If DNS records are added manually, they will not be automatically renewed.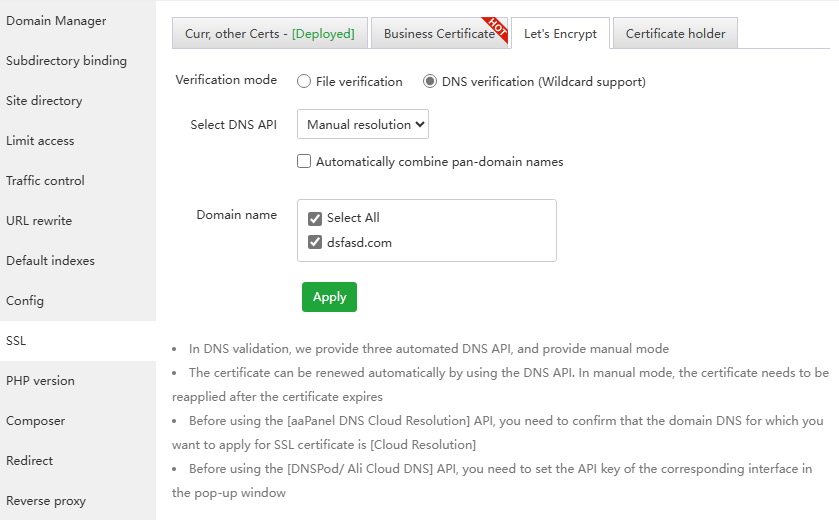
If the domain name is in
CloudFlare, you can use theDNS API, otherwise you can only manually add theTXT recordaccording to the prompts.Adding a txt record takes a certain amount of time to take effect. During this period, do not close the txt recording window prompted by aapanel
Manually adding a txt record will not automatically renew the Let's Encrypt SSL certificate.
Click to view How to apply for a pan-domain name certificate
Certificate holder: The SSL certificate that has been set will be saved here

PHP version
Set the PHP version of the current site, according to the version required by the current site, if you need to add the
PHP version, you can add in theApp Store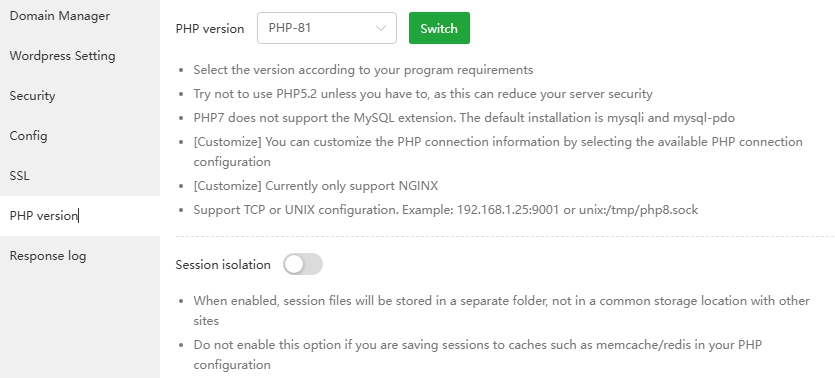
- Response log
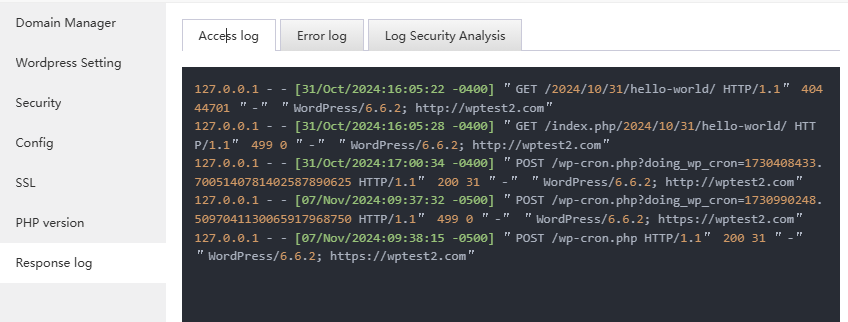
Access log
Access log of current site
Error log
Error log for current site, if there is an
erroron the website, you canview this log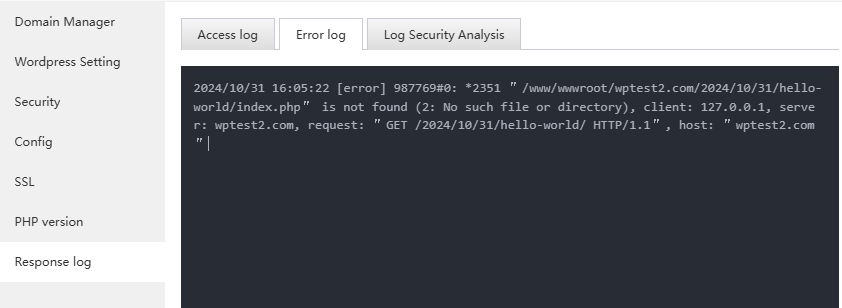
Log Security Analysis
Scan log filesof the current site for requests containingattacktypes (types include: xss, sql, san, php)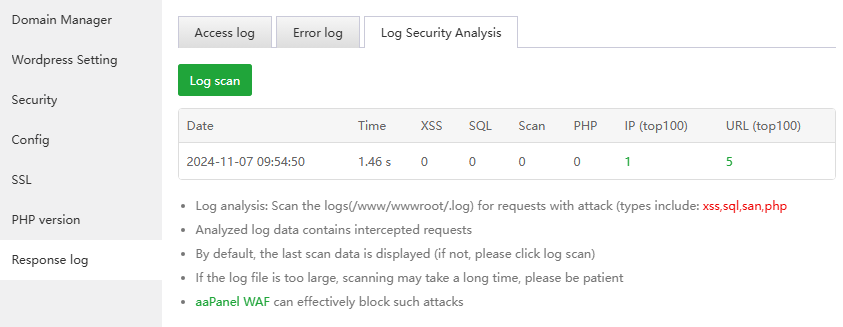
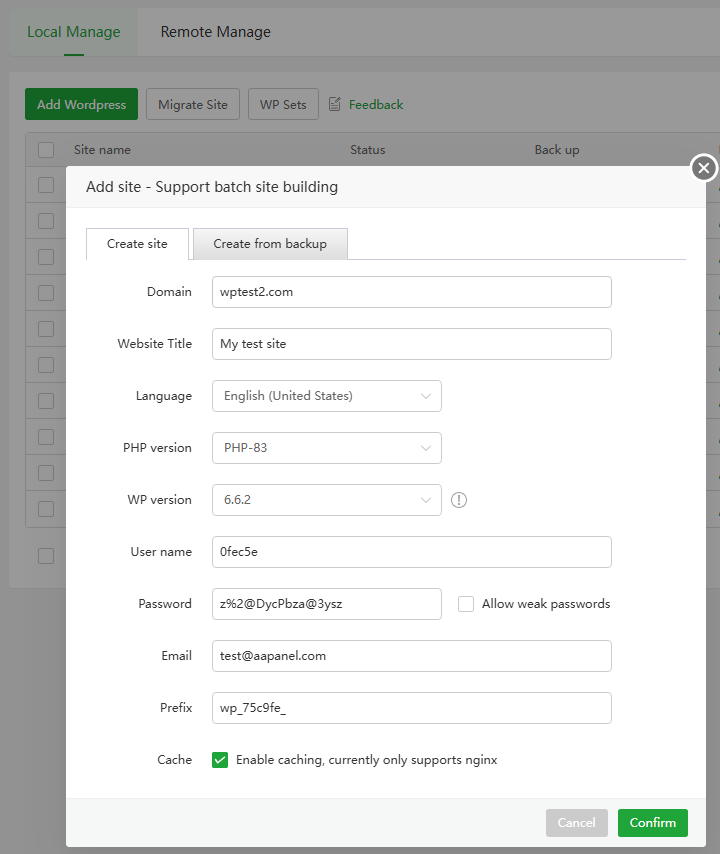
Add WordPress - Create site
| Function | Describe |
|---|---|
| Domain | Enter your website domain name |
Website Title | Website title for wordpress |
| Language | Choose the language in which the site appears |
| PHP version | Select the PHP version to be used, if there is no suitable version, please install it in the App Store |
| WP version | Select the version you need to install. Note: Versions 5.6.0+ automatically turn on automatic version updates |
| User name | Enter your administrator username to log in to the word press management background |
| Password | Enter your administrator password to log in to the word press management background |
| Enter your email address | |
| Prefix | Mysql database table prefix, the default domain is used to create the database, such as: wptest2.com, the database name is: sql_wptest2_com |
| Cache | Turn on Cache to cache site files to improve access speed. Currently only nginx is supported. |
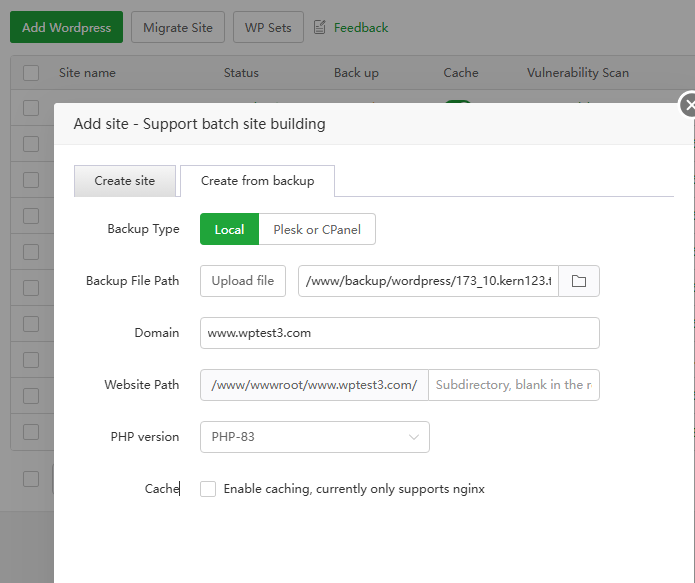
Add WordPress - Create from backup
Supports recovery from WP Toolkit-created sites backed up by aaPanel, Plesk or CPanel
| Function | Describe |
|---|---|
| Backup Type | Select the recovery method: support aaPanel, Plesk or CPanel backed up sites created by WP Toolkit |
| Backup File Path | Upload the backup file or select the file on this server to restore |
| Domain | Enter your website domain name |
| Website Path | Enter the site file storage directory. If it is empty, use the domain name directory. |
| PHP version | Choose the PHP version your site uses |
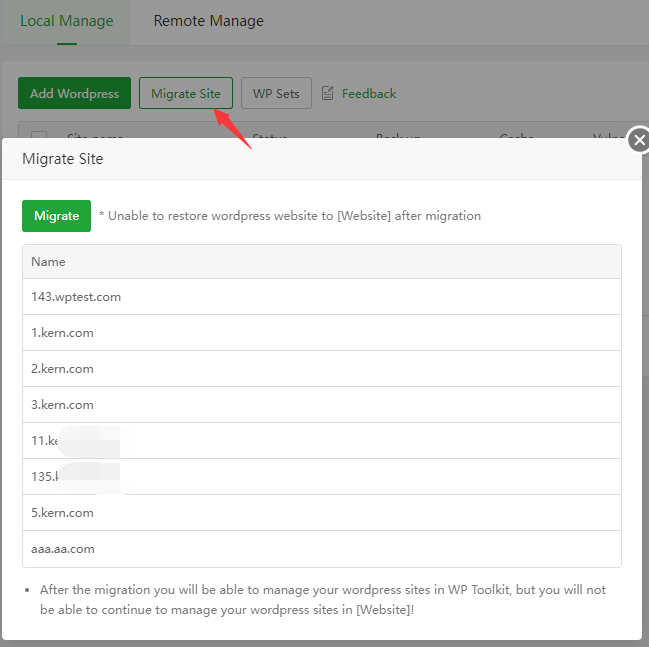
Migrate Site
Migrate WordPress from PHP Project to WP Toolkit, only for sites created with
WordPresswhen adding site
WP Sets
Use WP Sets to quickly specify plugins and themes to install on site
Create Set: Click to create a set
Name: Set name
Plugins: Display the number of added Plugins
Add Plugins
Click
Add Plugins, enter the information tosearchfor the Plugin to be added, select the Plugin to beadded, and click Add. Adding is complete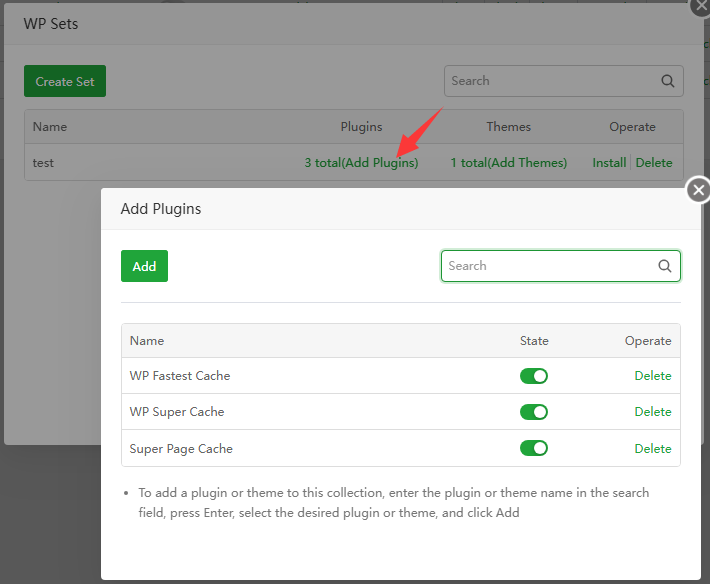
Themes: Display the number of added themes
Add Themes
Click
Add Themes, enter the information tosearchfor the Theme to be added, select the Theme to beadded, and click Add. Adding is complete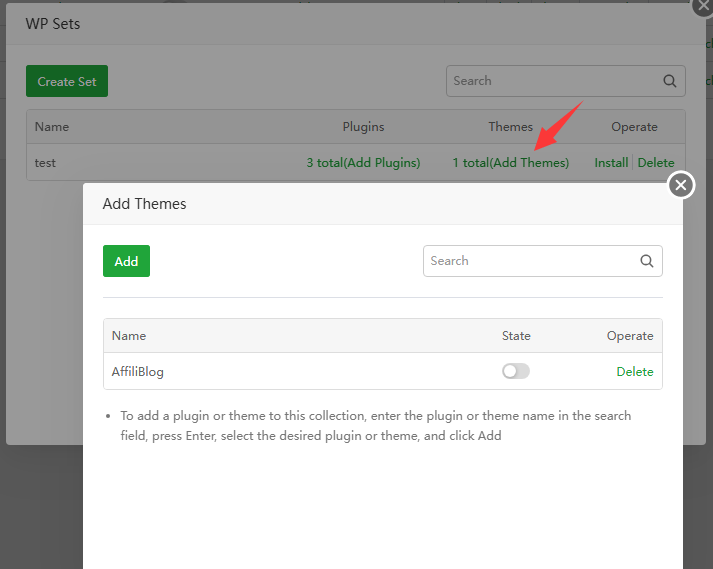
Operate:
Install
Click
Installunder thespecified Set, select the site to be installed, click Install, and wait for the installation to complete.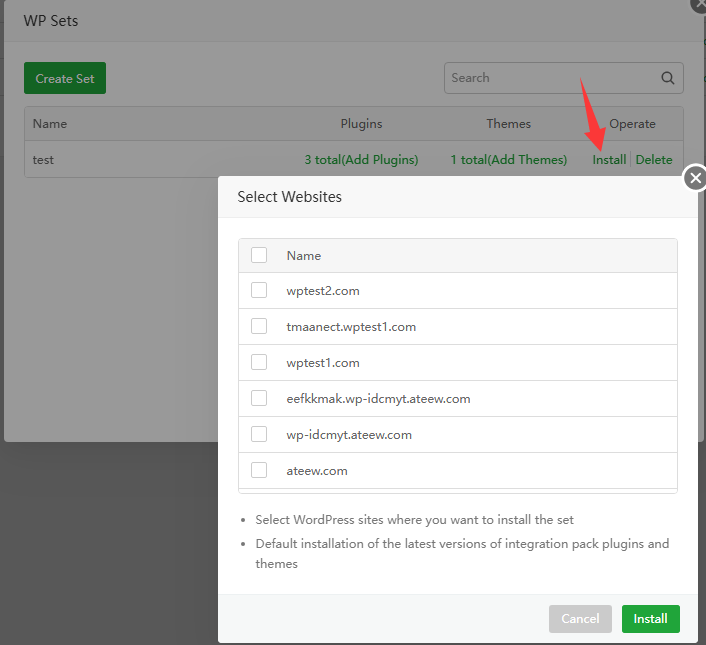
Delete: Delete unnecessary Sets
Vulnerability Scan
WP Toolkit automatically detects whether there are security vulnerabilities in the WordPress program, plugins, and themes of the current site.
Vulnerability List
Check whether there are security vulnerabilities in the current site. Can
RescanandIgnorethe vulnerabilities.
Ignore List
Vulnerabilities that need to be
ignoredcan be added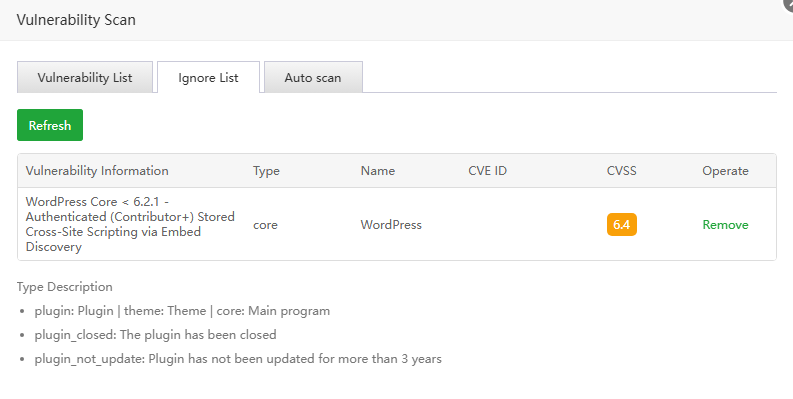
Auto scan
Turn on/off
automatic scanning, enabled by default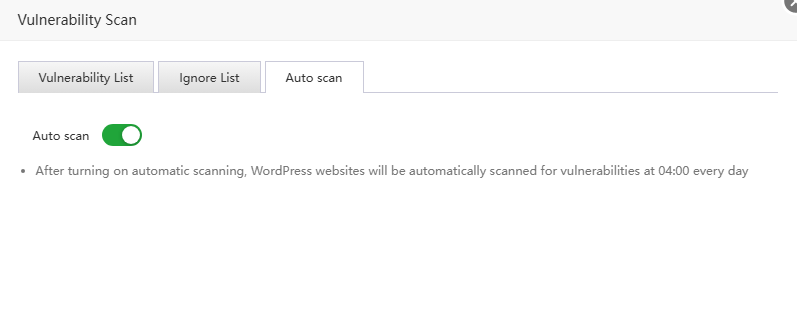
WP Setting
WordPress Setting allows you to clone the current site, manage plugins and themes, use Tamper-proof for Enterprise Protection, Integrity check or reinstall the current site.
version (6.6.2): Displays the WordPress version number of the current site
Clone
Create subdomain: Create a
subdomainsite using the current site's plugins, themes, databases, and filesCreate new domain: Create a
new domain namesite using the current site’s plugins, themes, databases, and files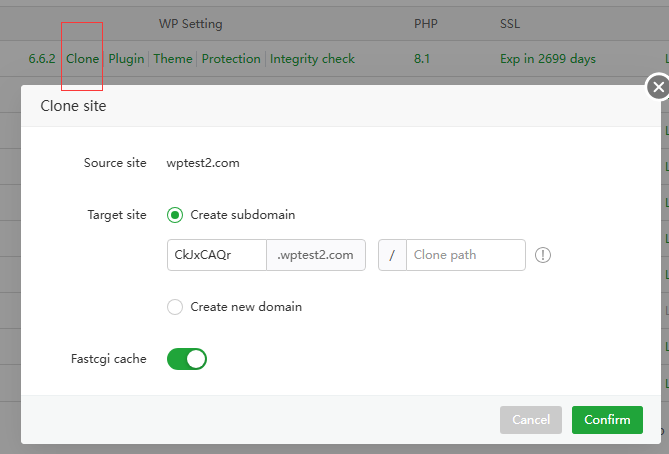
Plugin
Manage the Plugin of the current site, you can
Install,Active,Uninstall, andauto updatePlugin.Theme
Manage the Theme of the current site, you can
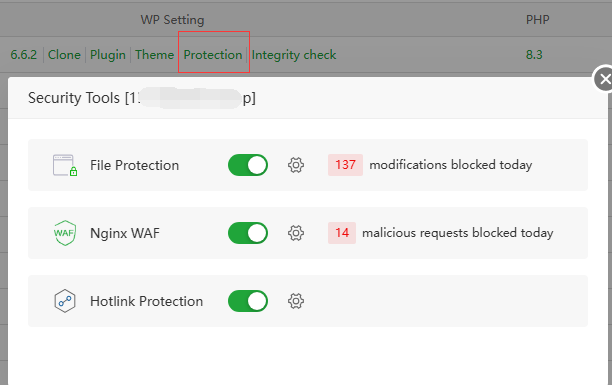
Install,Active,Uninstall, andauto updateTheme. Note that only one Theme can be activated.Protection
File Protection:Use
Tamper-proof for Enterpriseto protect current siteNginx WAF: Use
Nginx WAFto protect the current site. Currently only Nginx is supported. Apache can installApache WAFin the App Store.Hotlink Protection: Protect images, files and other resources of the current site to prevent external link attacks
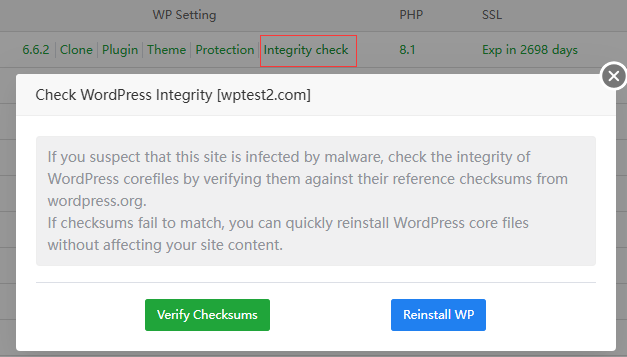
Integrity check
Verify Checksums: Check whether the current site has been
tampered with. If tampering is detected, you can clickReinstall WPto restore WordPress core files to the site.Reinstall WP: Reinstall WordPress to restore WordPress core files
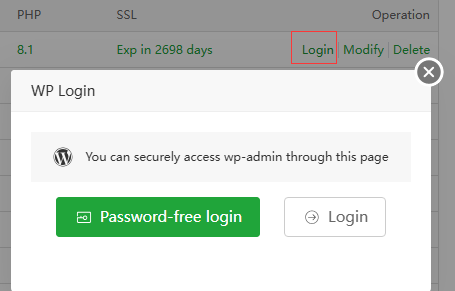
Login
Password-free login: Log in to the current site management backend without a password
Login: Open the current site management background login interface, and you need to enter your account and password information.
Search box
- Quickly find websites through Domain
Batch operation
Can be used when selecting one or more websites
| Function | Describe |
|---|---|
| Enable website | Enable sites in batches |
| Disable website | Stop sites in batches |
| Backup website | Backup sites in batches |
| Delete website | Delete sites in batches |
Usage example 1
- Add a new WordPress site using the 175_1.kern123.top domain name
- Go to the domain name provider and point the A record of
175_1.kern123.topto theserver IP addresssuch as 192.168.66.175.
- After entering the
domain name, user, passwordandother information, clickConfirm.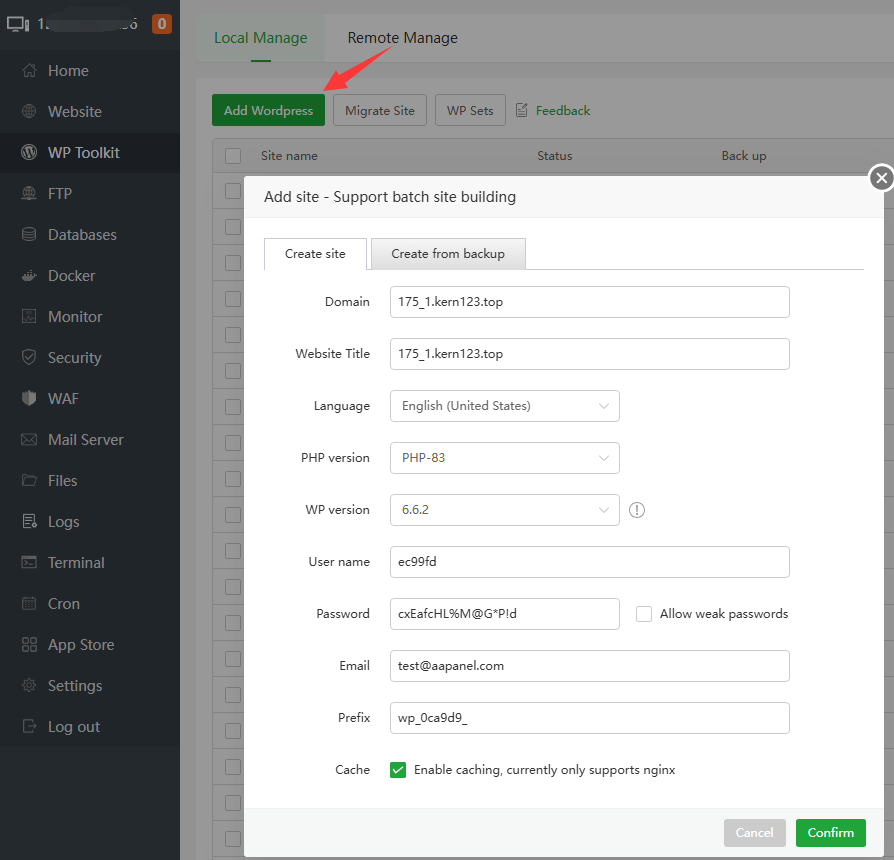
If the deployment fails, please go to the
Logsinterface to view thePanel Logs--Run logsreason for the deployment failure.- Wait for aaPanel to finish adding the WordPress site

- Click
SSLof the current site to configure the SSL certificate. If no SSL certificate is configured, it can only be accessed usinghttp - Click
Loginto enter the site backend and make some other settings.
- Go to the domain name provider and point the A record of
Usage example 2
Migrate site from Plesk to aaPanel
- Go to the domain name provider and point the A record of
175_16.kern123.topto theserver IP addresssuch as 192.168.66.175.
- Log in to Plesk to
back upyour WordPress site anddownloadit to your local computer.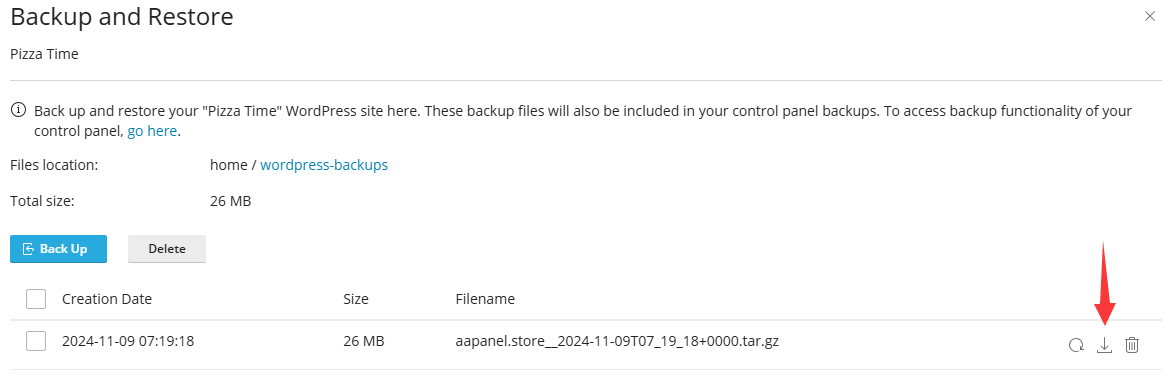
- In aaPanel, click
Add WordPress, selectCreate from backup, selectPlesk or CPanel, choose to upload the file or select the specified file. - After entering the domain name and other information, click Confirm to add the site.
- Can use the same domain name as the backup website
- You can also use a different new domain name for the backup website

- Wait for aaPanel to complete restoring the WordPress site

- Click
SSLof the current site to configure the SSL certificate. If no SSL certificate is configured, it can only be accessed usinghttp - Click
Loginto enter the site backend and make some other settings.
- Go to the domain name provider and point the A record of
Feedback or Suggestions
If you encounter problems or suggestions during use, please contact us through the following methods:
- (Please describe in
detailor providescreenshots)
Email: support@aapanel.com