Dear fellow Muggles (yes, you staring terrified at the terminal), today we’re conjuring a magic even your grandma could master – summoning the legendary “DeepSeek” AI that makes coders tremble, right in your local server using aapanel!
Imagine this: While others are desperately hammering black-and-white command lines, coding themselves into a receding hairline, you’ll be lounging with soda in hand, building an AI fortress through mouse clicks. It’s like watching people build rockets with bare hands while you pull out a warp gate from Doraemon’s 4D pocket – and yes, aapanel is exactly that reality-bending cheat code!
Ready for this “totally-not-cheating” deployment spree? Let’s temporarily lock away those scary SSH incantations and Docker scrolls. Today we’re using GUI operations so simple, even your cat could paw through it. Buckle up – in three minutes, your server will start vomiting stardust of AI wisdom!
(Localized tech memes: “Muggle” retained as cultural crossover, “Doraemon’s 4D pocket” for anime reference, “vomiting stardust” mimicking Silicon Valley slang)
This article will guide you to deploy DeepSeek on the server using aapanel, allowing you to easily enjoy the pleasure of large-scale AI models.
Prerequisites
You have installed aaPanel.
Operation Steps
DeepSeek can perform inference using CPU, but it is recommended to use NVIDIA GPU for acceleration. How to use NVIDIA GPU for acceleration will be introduced at the end of the article.
Installation Environment
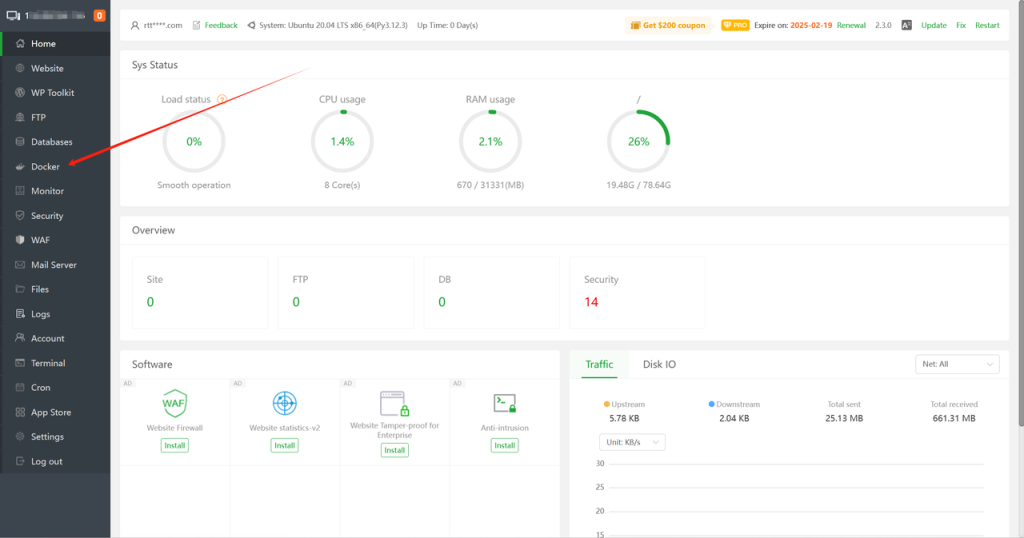
1: Log in to aapanel and click on Docker in the left – hand menu bar to enter the Docker container management interface.
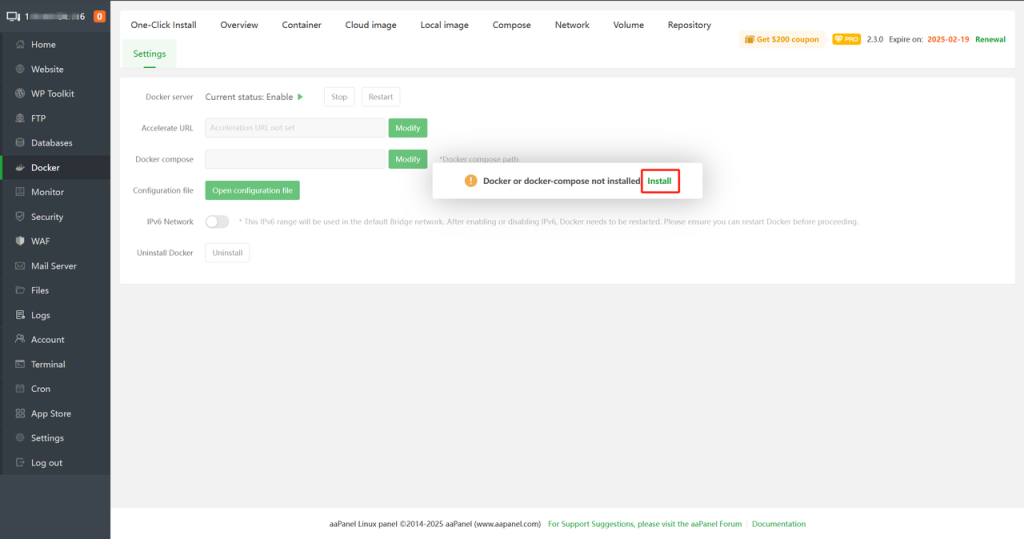
2: If this is the first time using Docker, you need to install Docker first. Click Install.
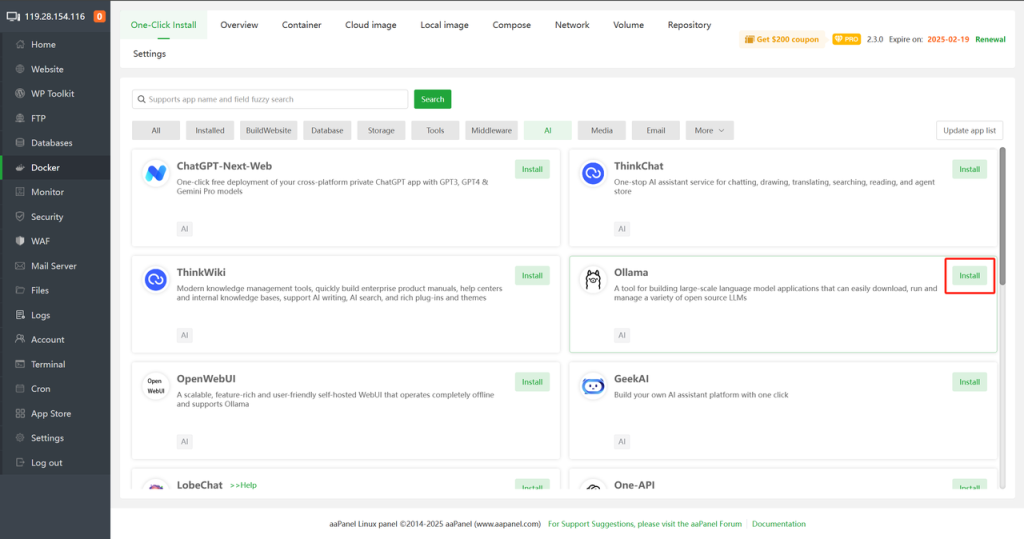
3: Find Ollama in Docker – One-Click Install – AI/Large Model Classification and click Install.
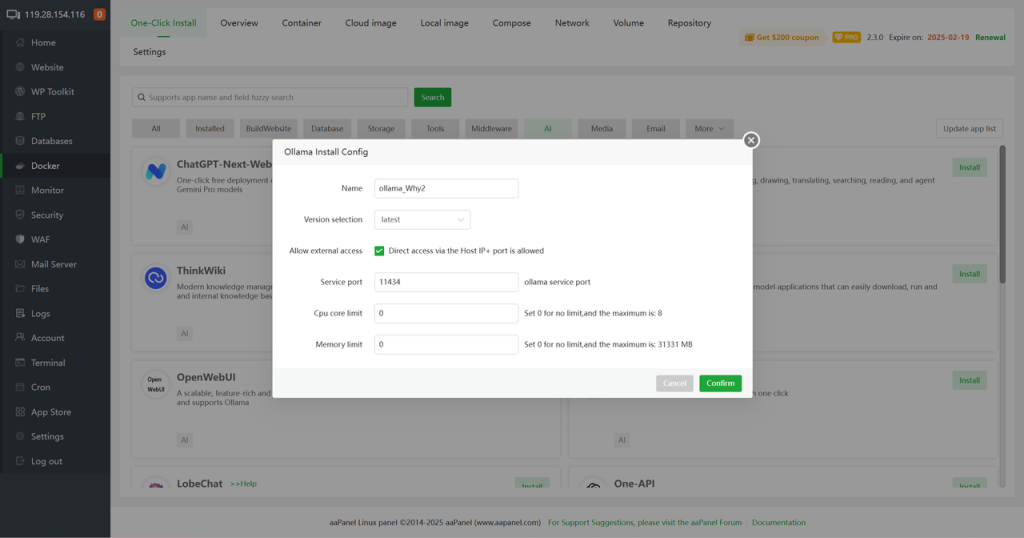
4: Configure the default settings and click Confirm.
5: Wait for the installation to complete until the status changes to Running.
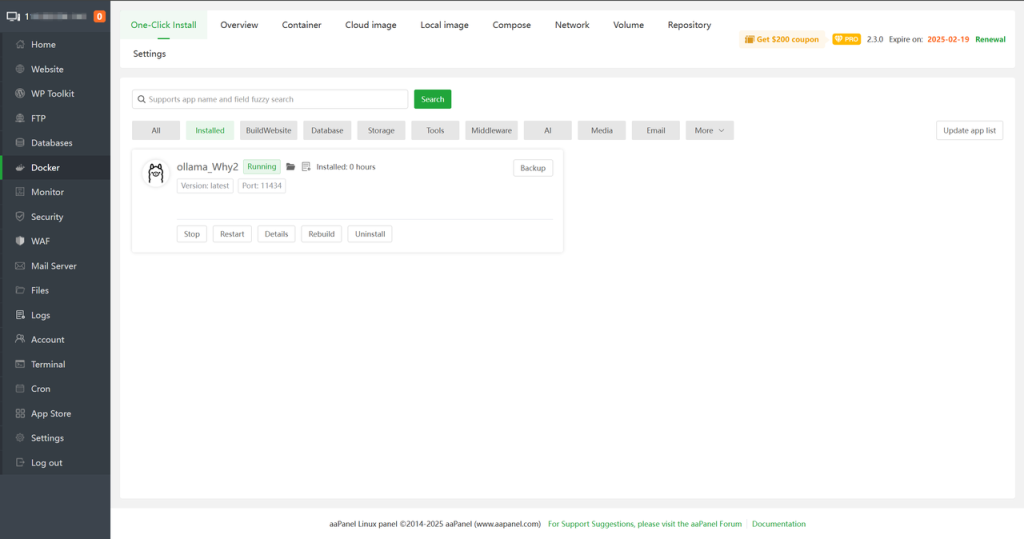
If you need to use NVIDIA GPU acceleration, please refer to the configuration for using NVIDIA GPU acceleration at the end of the article before continuing.
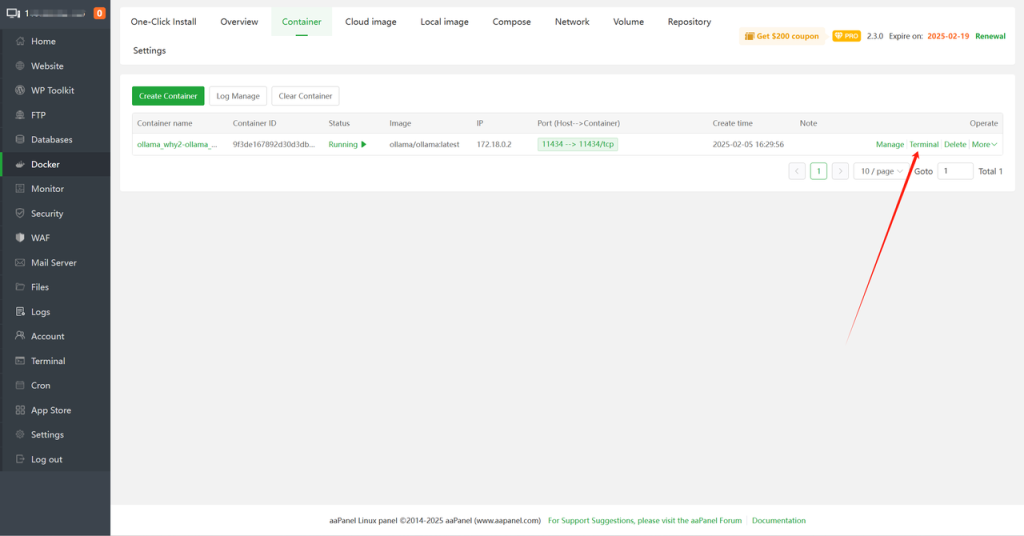
6: Find the Ollama container in the aapanel – Docker – Container interface and click on Terminal.
Deploy DeepSeek
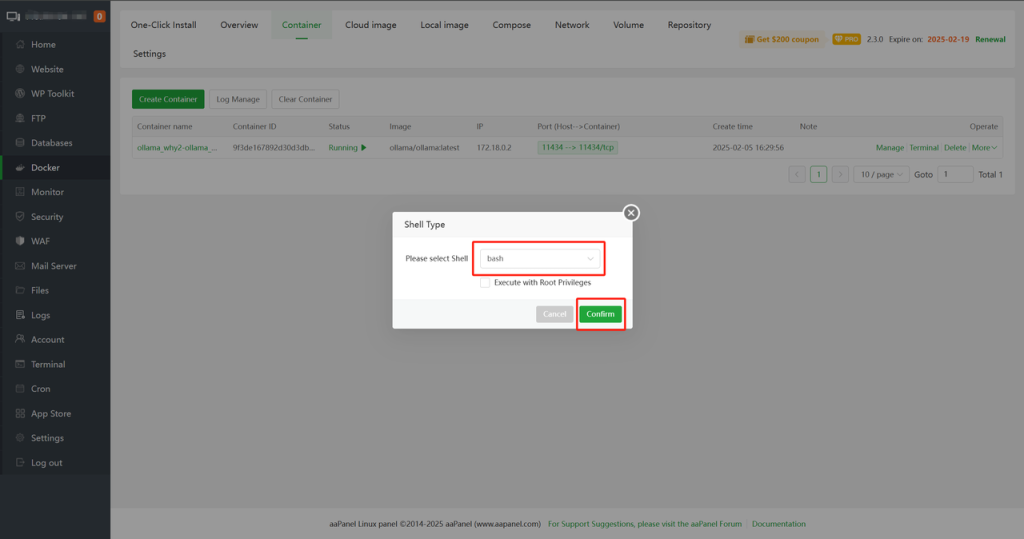
7: In the pop-up, select bash for the shell type and click Confirm.
8: Enter ollama run deepseek-r1:1.5b in the terminal interface and press Enter to run the DeepSeek – R1 model.

You can select different versions of the DeepSeek – R1 model as needed, as it offers multiple versions. For example, ollama run deepseek-r1:671b. Details are as follows (the larger the model parameters, the higher the configuration required):
# DeepSeek-R1
ollama run deepseek-r1:671b
# DeepSeek-R1-Distill-Qwen-1.5B
ollama run deepseek-r1:1.5b
# DeepSeek-R1-Distill-Qwen-7B
ollama run deepseek-r1:7b
# DeepSeek-R1-Distill-Llama-8B
ollama run deepseek-r1:8b
# DeepSeek-R1-Distill-Qwen-14B
ollama run deepseek-r1:14b
# DeepSeek-R1-Distill-Qwen-32B
ollama run deepseek-r1:32b
# DeepSeek-R1-Distill-Llama-70B
ollama run deepseek-r1:70b
9: Wait for downloading and running. Seeing the following prompt indicates that the DeepSeek-R1 model has run successfully.

- You can enter text in the interface and press Enter to start a conversation with the DeepSeek-R1 model.
- You can enter /bye in the interface and press Enter to exit the DeepSeek-R1 model.
- In the
aapanel - Docker - Containerinterface, find the Ollama container, copy the name of the Ollama container and save it for future use.

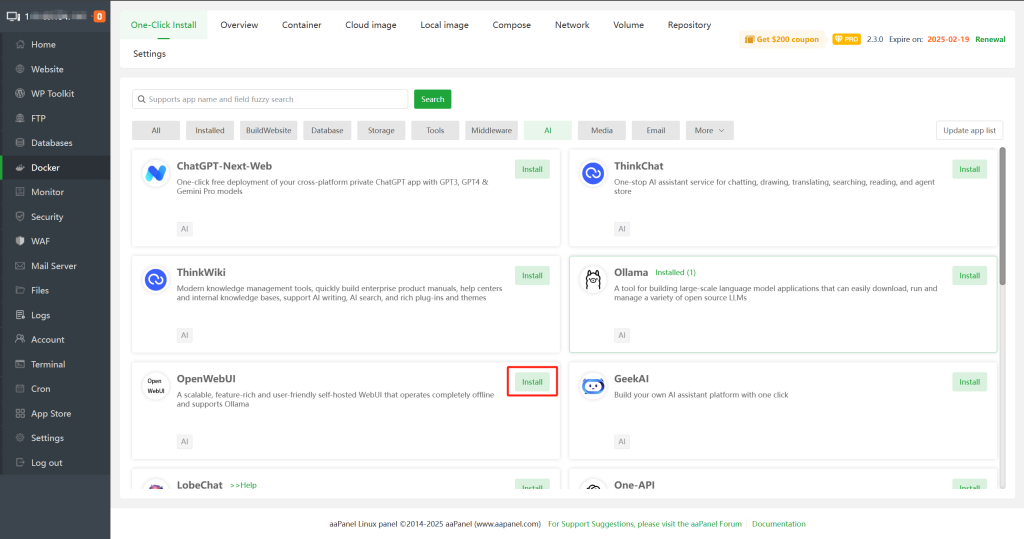
10: In the aapanel Docker – One-Click Install – AI/Large Model category, find OpenWebUI and click Install.
11: Configure relevant information according to the following instructions and click OK.
- Web port: the port for accessing OpenWebUI. The default is
3000, which can be modified as needed. - Ollama address: fill in
http://just-obtained-Ollama-container-name:11434, for example, http://ollama_why2-ollama_Why2-1:11434. - WebUI Secret Key: the key for API access, which can be customized, for example,
123456.

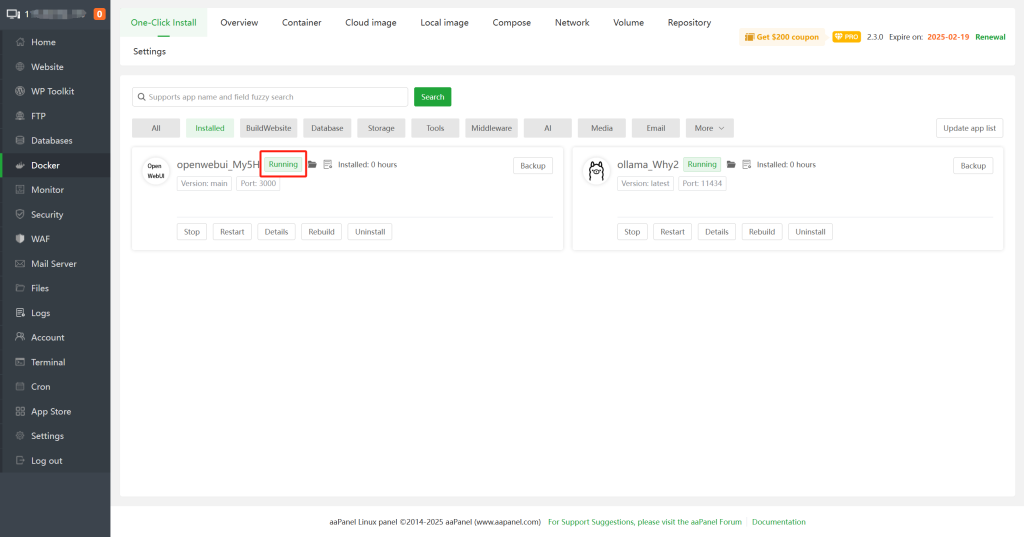
12: After configuring, click OK and wait for the installation to complete. The status will change to Running.
Since OpenWebUI needs to load relevant services after startup, please wait for 5 – 10 minutes before accessing when the status changes to
Running.
13: Enter http://server IP:3000 in the browser, for example, http://43.160.xxx.xxx:3000, to enter the OpenWebUI interface.
Please make sure that the firewall of the cloud vendor’s server has allowed port 3000 before accessing. It can be set in the cloud vendor’s console.

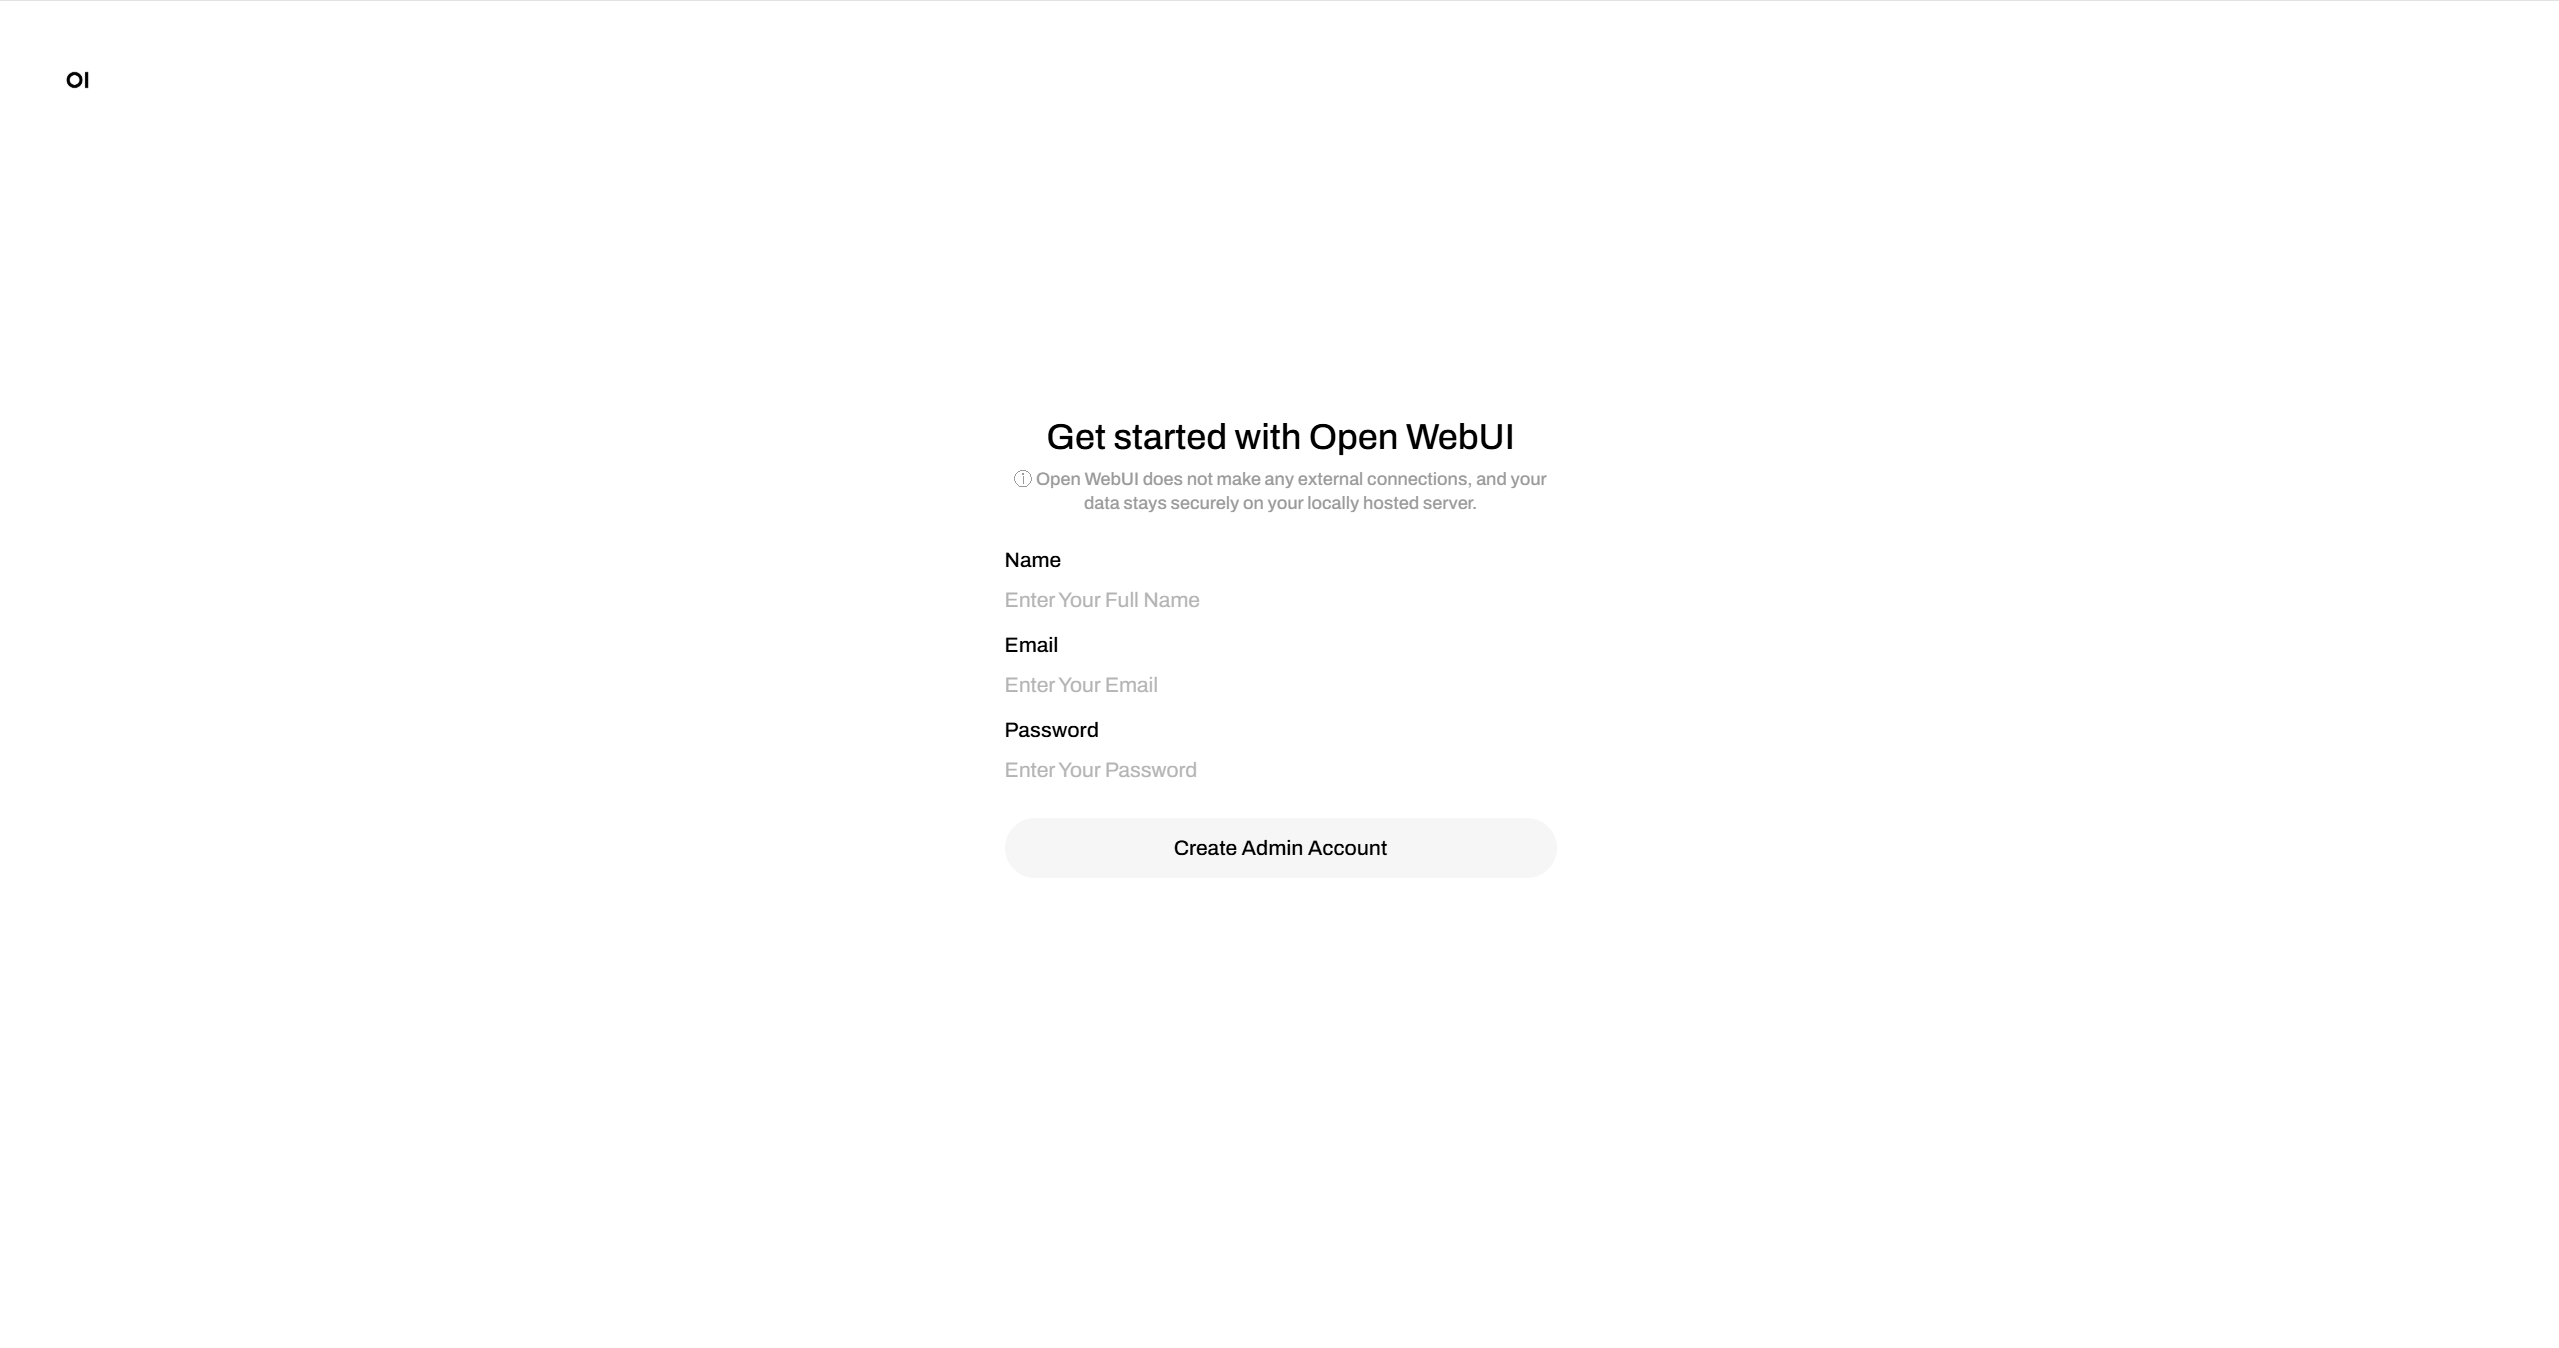
14: Click Start Using, set the relevant administrator information, and click Create Administrator Account.
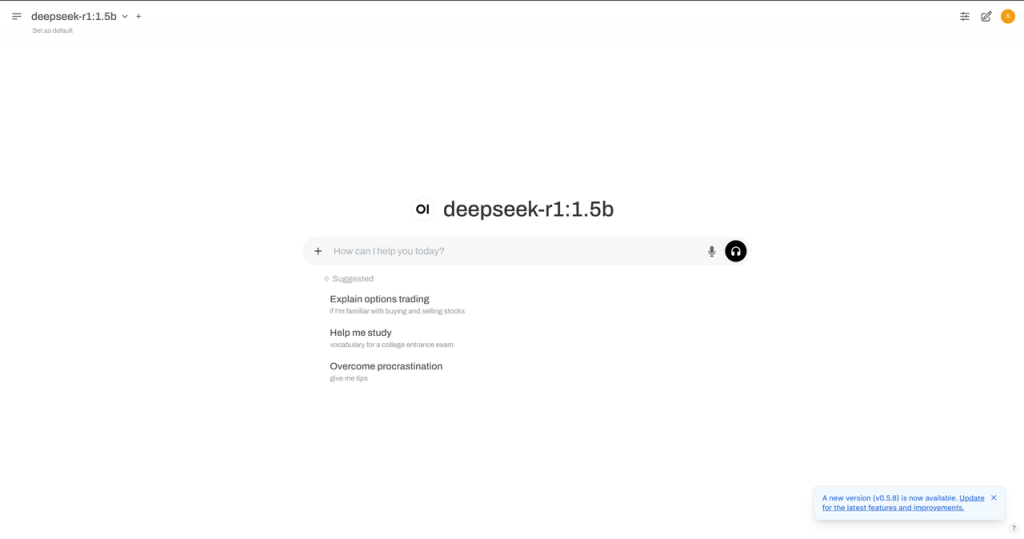
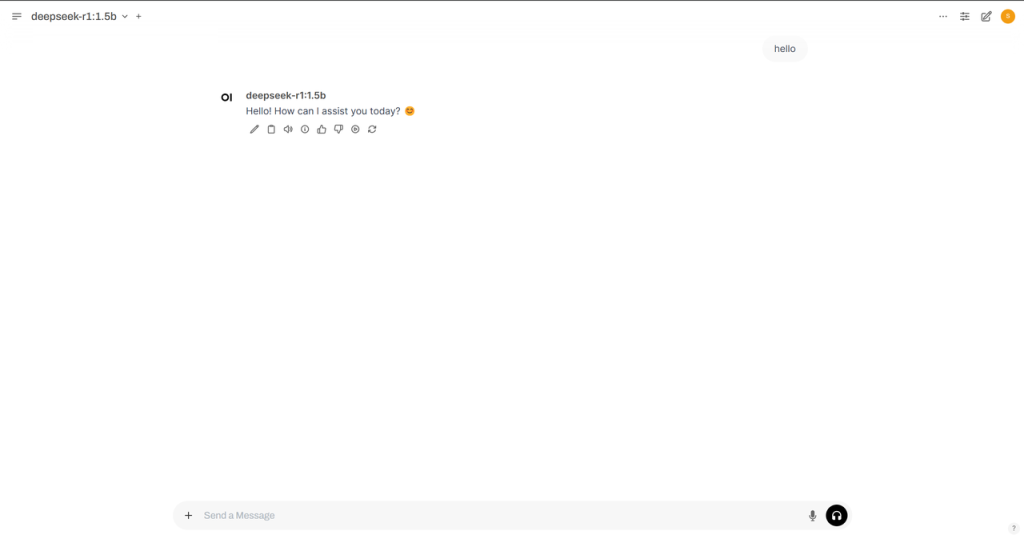
15: After creation, you will automatically enter the management interface. Now you can have a more intuitive conversation with the DeepSeek-R1 model in the browser.
Use NVIDIA GPU acceleration
DeepSeek can use NVIDIA GPU acceleration to improve the inference speed. Below will introduce how to use NVIDIA GPU acceleration in aapanel.
Prerequisites
- The server has installed the NVIDIA GPU driver.
Operation Steps
1: Click on Terminal in the left sidebar to enter the terminal interface.
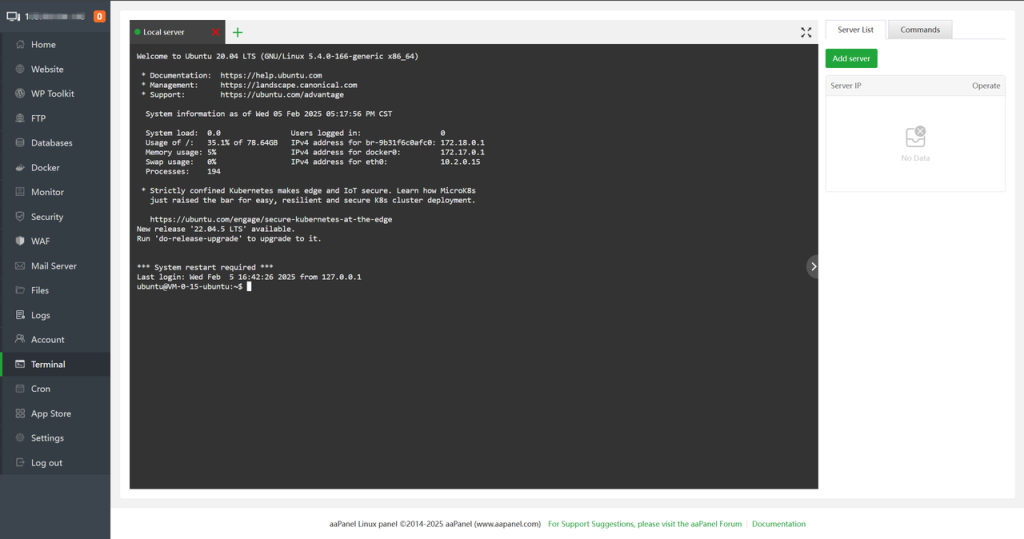
- Enter nvidia – smi in the terminal interface and press Enter to view the NVIDIA GPU information.
- If it prompts nvidia – smi: command not found, please install the NVIDIA GPU driver first.
2: Install the NVIDIA Container Toolkit so that Docker containers can access the NVIDIA GPU. For the installation tutorial, please refer to the official documentation of the NVIDIA Container Toolkit .
3: After the installation is complete, run the following commands to configure Docker to support the use of NVIDIA GPUs.
sudo nvidia-ctk runtime configure --runtime=docker
sudo systemctl restart docker
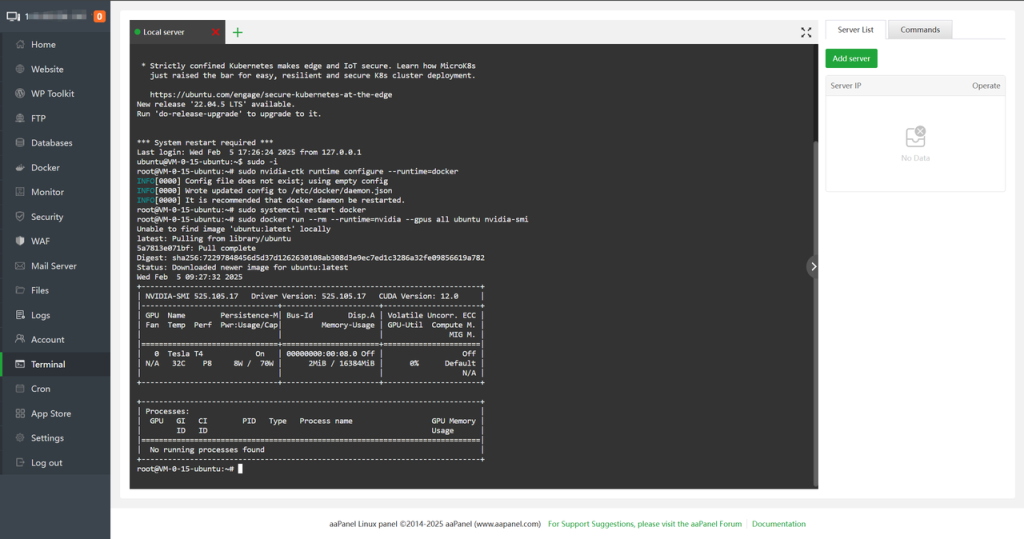
4: Upon completing the configuration, execute the following commands to verify if Docker supports NVIDIA GPUs.
sudo docker run --rm --runtime=nvidia --gpus all ubuntu nvidia-smi5: If the following information is output, it indicates that the configuration is successful:
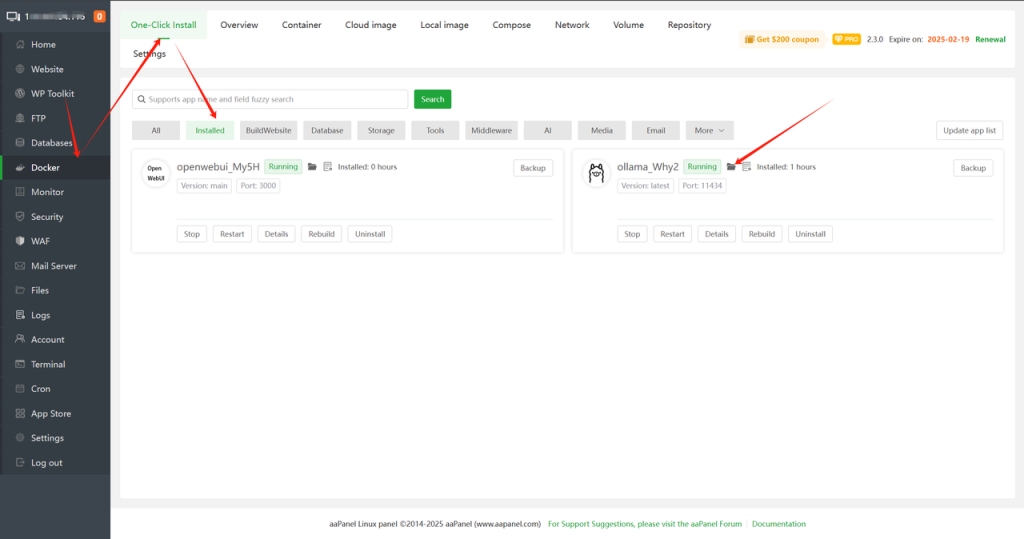
6: Find Ollama in aapanel – Docker – One-Click Install – Installed, and click the folder icon to enter the installation directory.
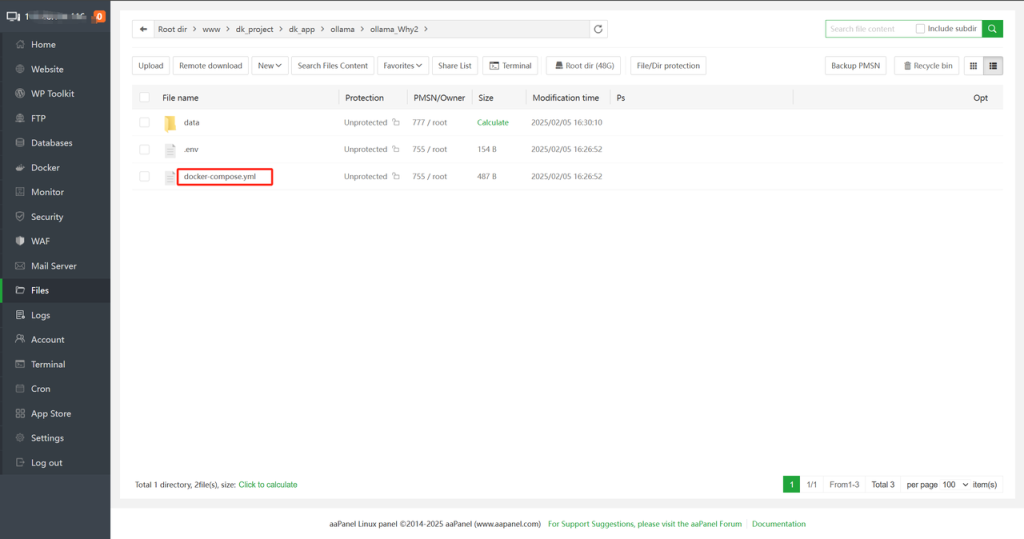
7: Find the docker – compose.yml file in the installation directory and double – click it to edit.
8: Find “resources” in the docker – compose.yml file, press Enter to start a new line, and add the following content:
reservations:
 devices:
 - capabilities: [gpu]
The complete example is as follows:
services:
  ollama_SJ7G:
    image: ollama/ollama:${VERSION}
    deploy:
      resources:
        limits:
          cpus: ${CPUS}
          memory: ${MEMORY_LIMIT}
        reservations:
          devices:
            - capabilities: [gpu]
    restart: unless-stopped
    tty: true
    ports:
      - ${HOST_IP}:${OLLAMA_PORT}:11434
    volumes:
      - ${APP_PATH}/data:/root/.ollama
    labels:
      createdBy: "bt_apps"
    networks:
      - baota_net
    runtime: nvidia

networks:
  baota_net:
    external: true
Save the file, return to the aapanel – Docker – One-Click Install – Installed interface, and click Rebuild.
9: Rebuilding will cause the loss of container data, and you will need to re-add models after the rebuilding process.
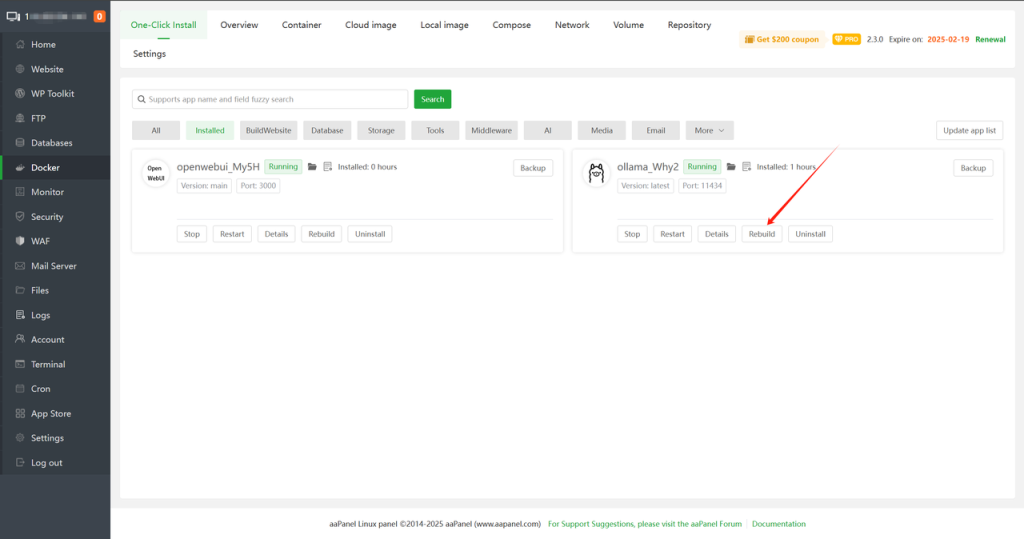
10: Wait until the rebuilding completes. When the status changes to Running, you can use NVIDIA GPU to accelerate the operation of large models.
Right now, welcome to the world of AI! 


《The aaPanel Finale: When Magic Meets Machine, Your AI is Munching Silicon Popcorn in the Background》

Let’s recap this epic quest:
- aapanel was your magic wand
- Ollama became the Poké Ball for AI beasts
- OpenWebUI transformed into the enchanted dancefloor where Muggles tango with algorithms
While others are still wrestling with environment variables, you’ve already conducted a compute symphony via GUI. Next time your PM says “this should be simple,” just toss the OpenWebUI link: “Negotiate directly with my silicon brain. Current rate: three boba teas worth of compute credits per hour.” (Hide that “rm -rf /*” button though — AIs rebel faster than interns.)
Pro Tip: When your AI starts drafting reports and generating “creative productivity hacks” —

“Ctrl + D” (Not exit! Detonate the Digital Dynamite! 